Link to Wes Bos’ course React for Beginners
I’m continuing my dual goal of a deep dive into JavaScript and React while looking for additional ways of explaining concepts to students. This time, I’m taking a Wes Bos course called React for Beginners.
The Skillcrush course uses Code Sandbox for its React lessons. And it’s really a great system. Your dev environment is already set and you can just start coding. But I also wanted to become more comfortable developing React locally.
tl:dr/tips
- You need Node.js version 14 or 16 for the class. More recent versions of Node will result in a
digital envelope routines::unsupportederror. - The tutorial currently uses Classes and state instead of hooks.
- To have a multi-page app, we’re using React Router.
- To use multi-cursors, alt + click on Windows, option + click on a Mac. You can change this to command + click in the Selection tab in the top menu (it’s the second from the bottom option.) This is super helpful when you’re adding multiple lines that are the same or need only a small edit – rather than retyping the entire line.
- There are a few details to watch out for. You’ll use
preventDefaultso that a form doesn’t automatically submit. And to clear a form so it’s ready for the next input, you’llresetit by runningevent.currentTarget.reset();. - Clicking the esc key while looking at React DevTools brings up the console so you can run a function you’ve written. Hit the esc key again to leave the console and return to React DevTools.
- Firebase‘s UI has changed. There are a few more buttons to click but the directions are pretty much what you need to do.
- You don’t need to hide the Firebase API key.
Why React?
React is a JavaScript library. It allows you to write less code than if you were writing vanilla JavaScript. You’re also able to break your UI into components. And when there’s a change to a component, only that component is re-rendered. So you don’t have the entire web page reloading with every change. You can keep track of state and you have access to life-cycle methods.
Installing a node version specific to this project.
My first challenge was that I couldn’t start npm. After a few tries, I looked back in my terminal and saw an error message: digital envelope routines::unsupported. Fortunately, Wes Box maintains a Slack channel and I was able to find out that I needed to be running Node.js 14 or 16; and I was using version 19. Following the recommendations in the Slack thread, I looked over the GitHub repos for nvm and n, I felt like the instructions for nvm seemed familiar. After running nvm --version I saw that I already had nvm installed. 🙌
I didn’t want to use version 16 globally, I wanted to use node version 16 just for this project. After a couple of failed tries, I followed the super helpful guidance that printed out in the terminal and was able to install version 16, just for this project, by running nvm install 16.0.0. And I made sure that version 16 was installed by running node --version.
It worked! Just to be sure I was starting fresh, I deleted the node_modules folder and the package-lock.json (I don’t know if I needed to delete the json file.) I was able to run npm install and then npm start to start the Create React App server on localhost:3000. The printout in the terminal also gave me an IP address so I could view the app on my phone. 🤓
Tab spacing in VS Code
As I started to follow the tutorial, I noticed that my usual tab spacing of 2 characters was now 4. ☹️ After going into VS Code’s settings and changing the value of “Editor: Tab Size” to 2 and then unclicking “Detect Indention”, tabbing resulted in a much nicer 2 spaces. 🙌
You can read more about settings for VS Code in their docs.
Version of React
The tutorial currently uses Classes and state rather than hooks. I’ve heard Wes Bos say on Syntax.fm that he plans to update the course with hooks in 2023. When adding the first class, we’re shown that we could import React or we could import “components” from React with import { Component } from 'react'; and then define the class by writing class ComponentName extends Component {}. Or we could import React from ‘react’ and the define the class with class ComponentName extends React.Component. Also, every class needs the render() method which specifies what HTML elements will be rendered to the page. Within the render()method, we return ()the HTML. (The space between return and ()is important so that the JSX isn’t seen as an argument to a return method.)
To allow React to work within our app, we need to mount it the application to the page. The index.html file has a <div> with an id. We use that id in the render() method in our index.js file by writing render(<App />, document.querySelector('#id'));. If we aren’t using React for the entire application, we could still use a <div> to mount the React we are using in addition to the rest of our HTML in the index.html file.
To render our React to the page, we need a secondary package called React-dom which we import into our index.js file by writing import { render } from 'react-dom';. We’re required to import React-dom because React can be used for multiple purposes and we want to specify that we’re using it for a web app. Adding { render } within our import statement means that we’re only importing the render method from React-dom.
React DevTools
The version of React DevTools in the tutorial is a previous version. You can still follow along pretty easily though. Instead of clicking on just “React” in DevTools, you click on “Components”. I already had React DevTools installed, but if you don’t you can download the extension in the browser.
One way to inspect the DOM in React DevTools is to select an element on your web page and in the console type $r which will show you an instance of the component and its properties (including props.) If you open the instance, you can see that it’s an object. This is similar to how we can type $0, $1, and $2 (etc.) to see the last, second-to-last, and third-to-last element that was clicked when not using React. It’s a nice trick. 🤓
What do you learn about?
Components
We’re going to build our app by creating multiple components. Each component is created as a class and is exported from the child component and imported into the parent component. When we export, we’re using a default export. And when we import, we need to add a path to the component so that it’s clear that we’re importing the component from within our app.
Components allow us to write code once and use the component in multiple places on the site.
Props
We use props to move date (and functions) between components. We can also think of props as an argument object that is passed to a component.
When we pass props, we can pass a string by surrounding the data with quotation marks. If we pass anything other than a string, we surround it with curly quotes {}.
When props are passed into a component, we write {this.props.object-properties}. this is a component instance returned from the parent component. props is an object within the component that is being passed. And within props we have properties that we’re passing.
If we’re passing props to a functional component (a function, without state, that renders part of the UI) we instead pass props as a parameter and remove the “this” keyword. Then to use whatever data is inside of props when we render the UI, we write props.object-properties.
State
State is an object that lives inside of a component that stores data that it and its children needs. When we’re writing React, instead of updating the DOM, we update our data and React can update any places on our site that uses that data.
So how do we do that? Have one place our data lives that updates everywhere the data is used throughout the site? State lives in the parent component (in this case the App component) and can only be updated in the parent component. When state is updated, that data can be updated in the the App component’s child and that component’s child, and so on.
I feel like the part that can be difficult to understand at first is that the input fields and the button to import state are in the functional component. But, even though this is where the data is added, it isn’t where the data lives. The button triggers the function that takes in the information and assigns it to the fish variable. Then the function in the App component is called that updates state. Only after state is updated in the App component is the data updated in any component. Also, data can only be passed down, it can’t be passed up.
Firebase
We’re using Firebase for the database of this app. Firebase’s UI has changed, but you can pretty much follow along with the instructions in the tutorial. There’s also an update in the instructions of what you’ll add to the base.js file.
Sometimes you’ll need to click an extra button or two while you set everything up. Unfortuntely, I didn’t keep track (and they may update it again 🤷♀️) but the one place I think it could be confusing is when you’re ready to copy the apiKey, authDomain, and databaseURL, there are now two options, “use npm”, or “use a <script> tag”. But the same info is in both – so it’s fine to copy from either.
It may be because we’re using Firebase, but I noticed that sometimes it takes a moment before code changes take effect. So if you don’t see an update, give it a bit before you start debugging. 🙂
LifeCycle methods
Functions that are called at specific times. We use one for when the page loads which is called componentDidMount and another when we switch stores called componentWillUnmount. We also use componentDidUpdate which is invoked when an update occurs.
Local Storage
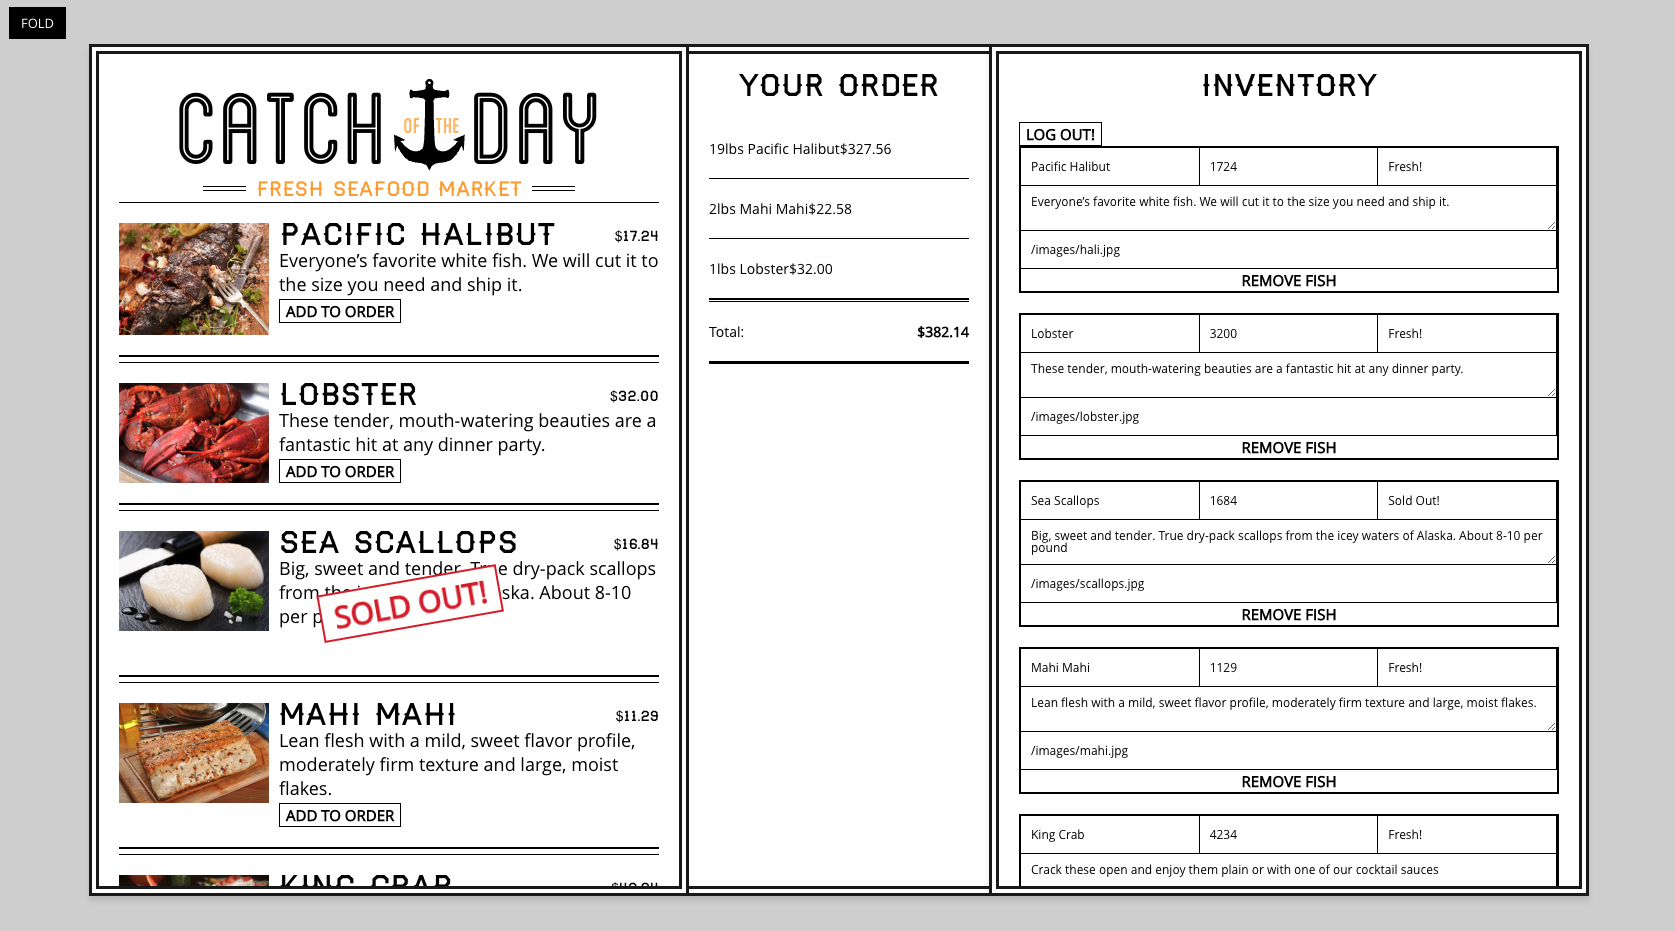
The browser’s storage uses key: value pairs. We’re using the Firebase database for our inventory and local storage to keep track of the customer’s order.
Animation
Every class I work on from Wes Bos he demonstrates some animation. I’ve taken an animation class before from Scrimba, but it’s nice to see implement small amounts to really get a feel for how the properties work.
Authentication
We implement signing in using Facebook, Twitter, and GitHub. I didn’t have a Facebook developer’s account, so I had to register first. Once registered, I was able to click the “Create app” button. Then I selected “none” as the app type. Really I was just winging it, but it seemed to work ok. And I was able to move on to creating an application. For Twitter, after registering for an account (I chose Academic > Student), I clicked on Projects & Apps > Overview and from there was able to figure out how to proceed. It was strange because I already had a developer account. So I’m not sure why I had to re-register – but things change and you just need to adapt. GitHub was simple – the UI was almost exactly like the tutorial’s video. It makes me wonder how difficult it is to have email/password signin. Would I need to worry about keeping passwords secret or would Firebase take care of it? And would I need to hide the API key? 🤔
Deployment, Ejecting from create-react-app, GitHub
The last few lessons include instructions to deploy to Now, Netlify, and a server like SiteGround. There’s also a lesson on ejecting from create-react-app in case you no longer want to rely on create-react-app’s setup. This is permanent apparently, so Wes suggests creating a branch just in case.
Even though there’s an API key for Firebase in the base.js file, it’s fine to include it when you initialized the repo and push to GitHub. (Documentation)
I decided not to deploy to either for now. I tried creating a GitHub Pages branch. I’m not sure if I should have named the repo handsome-fierce-children instead (or maybe /store/handsome-fierce-children?) I may look into it more later, but I’m happy for now.
Summary
This is a great course! There have been some things I really wanted to learn about like implementing a database with a React application. And I always enjoy Wes Bos’ courses. He explains concepts very well. I would like if there was a slight pause after he enters a line of code so I had time to stop the video, but that’s super minor. I’m looking forward to when he updates the course with hooks. I may try to deploy to Netlify then. 🙂